Toolbar and Menu Items
Toolbar Items
Once you have created or opened a Catchment File, you are presented with a "tabbed" ribbon. Each tab provides access to tools needed to create a catchment mode, run MUSIC and analyse results.
Each tab is shown below along with a short explanation. You should familiarise yourself with the purpose of these menu items, and their keyboard shortcuts, where appropriate.
| Tab | |
|---|---|
| music | 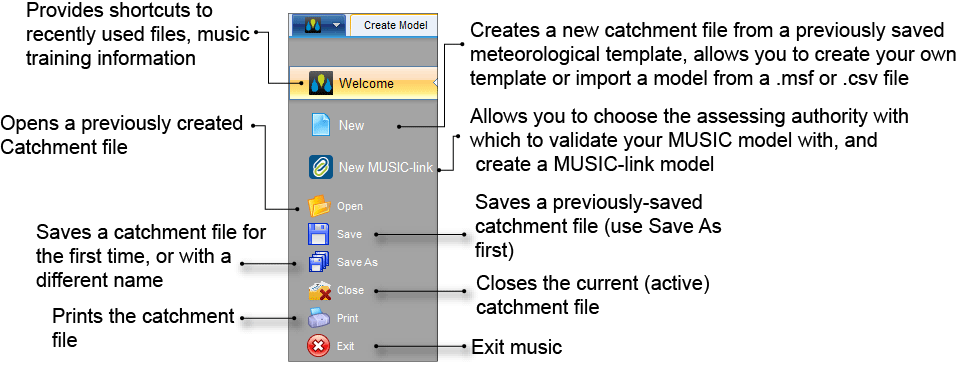 |
| Create Model | 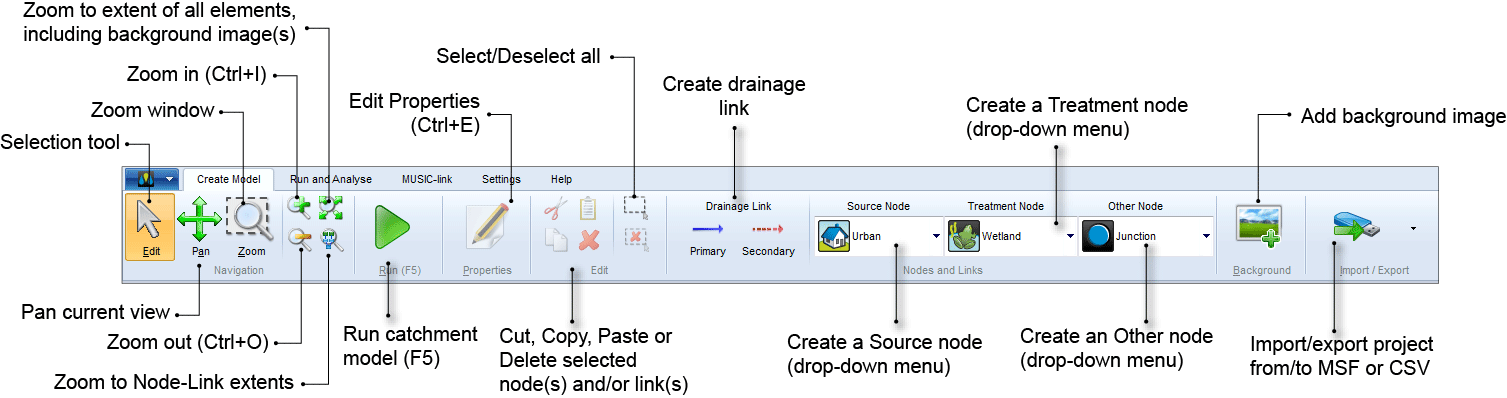 |
| Run and Analyse | In this tab, the Navigation and Run buttons perform the same functions as in the Create Model tab.
|
| MUSIC-link | 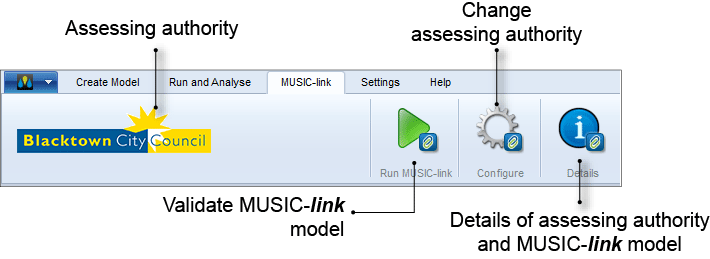 |
| Settings | 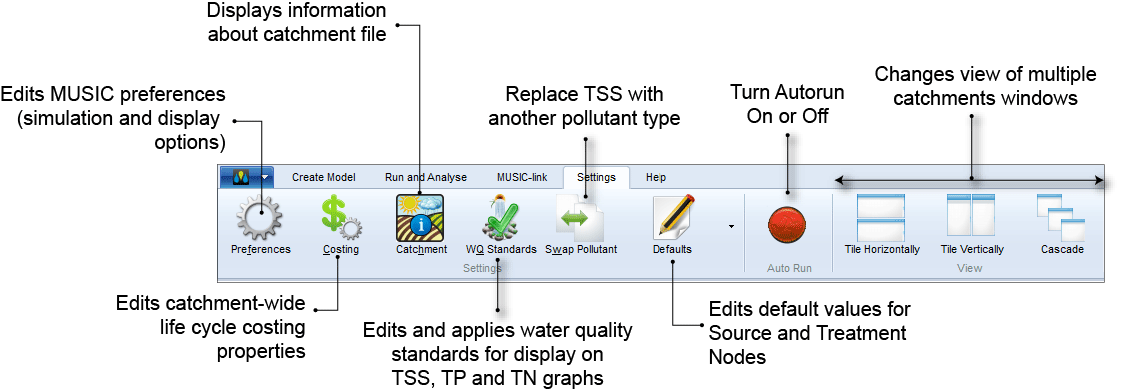 |
| Help | 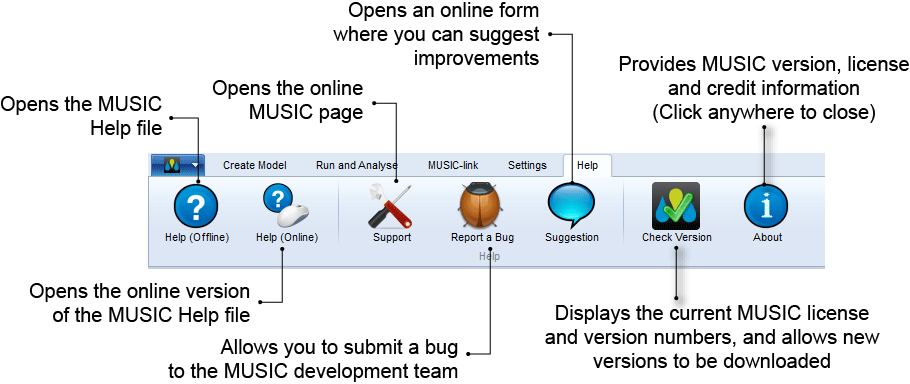 |

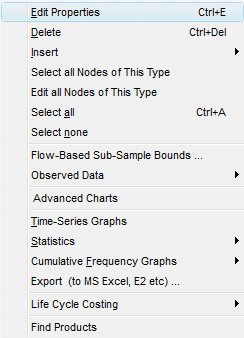
Context-sensitive menus are available by ‘right-clicking’ on any Node or Link within a catchment. This menu will allow you to add new Nodes and Links or edit the properties of an existing Node or Link. The full menu will only be available when MUSIC is in Auto-Run mode, or the current Catchment file has been run (F5) since any modifications were made to it (ie. there are current simulation results to display).
The context-sensitive menu will also allow you to display statistics or charts from the selected Node or Link (refer also to Production and Interpretation of music Output):
 Tip Box
When you move your pointer over an object, field or menu item, a Tooltip will appear, explaining more about that item.
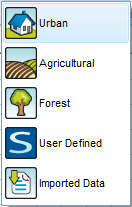
Source Nodes
To create a Source Node, left click on the Source Nodes drop-down menu on the Toolbar, and select one of the following Source Nodes:
Tip Box
To create multiple nodes of the same type, simply hold down the SHIFT key before clicking the desired node Toolbar icon.
Once you select a Source Node, you will be presented with a series of dialogue boxes, which allow you to specify the characteristics of the source node. If you have selected an internally modelled node (Urban, Agricultural, Forest, or User-defined), you will be asked for the proportion of impervious area, the soil properties, and the baseflow and stormflow pollutant concentrations for TSS, TP and TN. If you have selected the Imported Data Node, you will be guided through the process of importing time series data from a comma, space, tab, or semi-colon delimited text file.
More information on specification of these characteristics is provided in Creating a Stormwater Treatment Train.
Refer to Editing Source Node Properties for an example of the dialog boxes to configure a Source node (the only difference between the three pre-defined (agricultural, forested, urban) source nodes is the default pollutant concentrations). Therefore, any Source Node Type can be edited to simulate any desired characteristics (e.g. road or roof runoff).
MUSIC also includes a generic user-defined Source Node ( ), which does not include default water quality parameters. You can use this to specify any source node, where you prefer not to use one of the three default types, whose icons imply a certain land use. NOTE: any Source Node can be used to generate any pollutant behaviour, but the User Defined Source Node is useful where you wish to show that the node is NOT a standard Agricultural, Forested or Urban node.
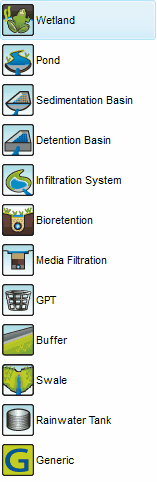
Treatment Nodes
To create a Treatment Node, left click on the Treatment Nodes drop-down menu, and select one of the following Treatment Nodes:
Tip Box
To create multiple nodes of the same type, simply hold down the SHIFT key before clicking the desired node Toolbar icon.
Once you select a Treatment Node, you will be presented with a series of dialogue boxes which allow you to specify the characteristics of the particular treatment node. At any time, these dialogue boxes can be recalled to modify the treatment node’s characteristics, by right-clicking on the selected node, and choosing Edit Properties (you can also edit the properties of any selected node by clicking the Edit Properties toolbar icon ( ).
).
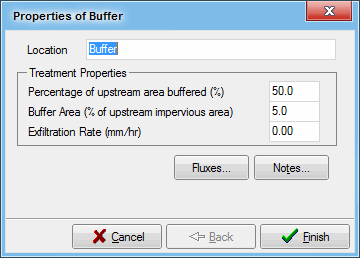
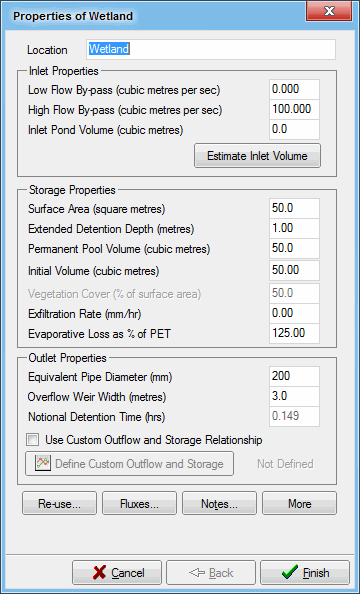
The following examples show the dialog box for Buffers and Wetlands.
You should explore the dialog boxes for the other Treatment Nodes by clicking on their respective Toolbar icons, and then clicking within the Catchment file window.
Tip Box
You can edit the ‘advanced parameters’ for each treatment node by clicking on the MORE button in the dialogue box, where available.
Other Nodes
To create a Junction Node, Receiving Node, Pre-Development Node or Post-Development Node click (left) on the Other Nodes drop-down menu, and select the appropriate node:
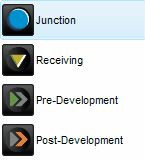
A Junction Node simply allows two upstream tributaries to be merged. It provides no treatment, and directly passes through any flow or water quality characteristics to the next downstream node. The Receiving Node is used to specify the discharge point of the catchment being modelled, and again, performs no operations on flow or water quality received by it.
The Pre and Post-Development Nodes function in a similar manner to the Receiving Node and are used to represent discharge points from the catchment being modelled. These nodes are used for comparing development flows and loads before and after development.
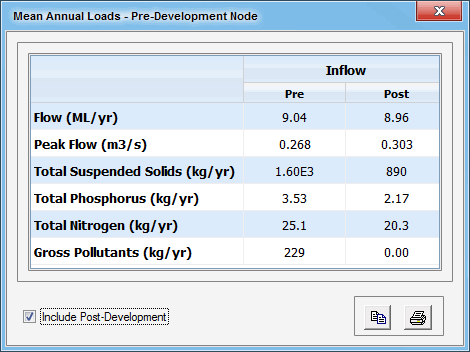
Inclusion of Pre and Post-Development nodes in the same model allows expedited comparisons to be completed for certain outputs. For example, when a project is created with both Pre and Post-Development nodes, check boxes are available in the Mean Annual Loads, Treatment Train Effectiveness and Statistics Dialogs allowing easy comparison of common output types within the same dialog, as shown below. This can be used, for example, to verify that a proposed development will not produce any increases in post-development loads relative to existing conditions.
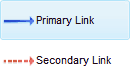
Drainage Link
The Drainage Link, as its name implies, links flows from one node to the next downstream node. To create a drainage link, select either the "Primary Link" or "Secondary Link" from the drop down menu and then left click and drag from the "from" node and release the left mouse button when you are on top of the "to" node.
Editing Drainage Link Properties describes the available drainage link properties in more detail, including the provision to specify flow-routing properties at each drainage link.
Split flows
MUSIC incorporates a facility to allow outflow components from source and treatment nodes to be routed via different flow pathways. This allows, for example, the routing of surface flows and groundwater/infiltrated flows via different treatment pathways.
If you setup a MUSIC project with just 'Primary' drainage links, MUSIC will automatically route all default outflow components to the next downstream node (as defined by the 'Primary' drainage link). If you wish to route any default or other non-default outflow components via an alternate pathway, it will be necessary to use 'Secondary' drainage links.
'Secondary' drainage links can be created in much the same way as 'Primary' drainage links. However, there are a few rules that must be adhered to:
- Secondary drainage links can only be created from Source and Treatment node types.
- You must specify a primary outflow link and at least one inflow link before you can add a secondary drainage link from a node. Only one primary outflow link can be added for each node but multiple secondary outflow links can be added to each node. Specifically, the number of outflow links is limited to the number of outflow components for a particular note. For example, if a node has five different outflow components, then a maximum of five outflow links can be created (i.e., one outflow component per link).
- The arrangement of drainage links must not create any "closed drainage loops" (an error message will be displayed if this occurs).
- When you create a secondary drainage link, the properties dialog should automatically appear allowing you to select which outflow component you would like to associate with that link (as shown below). More than one secondary outflow link can be added to each node (up to the limit mentioned above) and more than one outflow component can be assigned to each link, if desired. If you hold down the shift key while selecting the secondary link from the drop down box, you will be able to create multiple secondary links and the automated link property dialog "popup" will be suppressed.

- You will not be able to switch off any of the default flow components from the primary drainage links (e.g., pipe flow, weir flow etc). This ensures that all default flow components are always routed downstream (so water does not disappear!). You will not be able switch on any of the non-default outflow components via the primary drainage links (e.g., infiltration, reuse, ET etc). These non-default flow components can only be added via the secondary drainage links.
- Any of the available flow components can be added and removed via secondary drainage links. MUSIC will ensure that only one flow component is shared between all outflow links for a particular node. So, for example, if you add "Pipe flow" to a secondary link it will be removed from the primary drainage link.
- To see what outflow components are currently associated with a particular link without opening the link properties dialog, just run the cursor across the link and they will be displayed as a tooltip/hint.