Note: This is documentation for version 4.11 of Source. For a different version of Source, select the relevant space by using the Spaces menu in the toolbar above
Annual accounting
Add annual accounting
Create an annual accounting system as follows:
- Choose Edit » Resource Assessment... to open the Resource Assessment Explorer; and
- Right click Resource Assessment and choose Add Annual Accounting.
Managing an annual accounting system
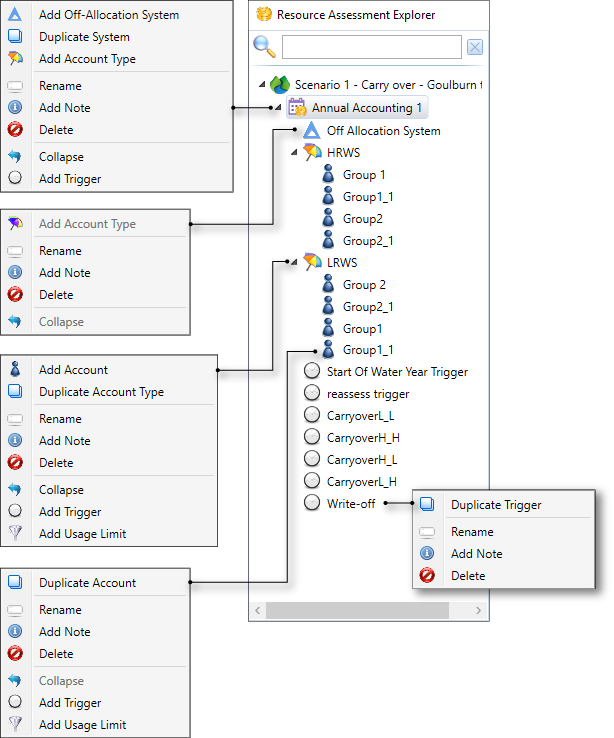
The tree menu on the left-hand side of the Resource Assessment Explorer (Figure 1) allows you to view all components in your resource assessment system, including any continuous accounting or continuous sharing systems.
In addition to standard functionality (eg. Rename, Delete), you can also do the following from the appropriate context menus (Figure 1):
- Add a new off allocation system, account type, account, trigger or usage limit by selecting and right-clicking the parent of the new component.
- Duplicate the selected component;
- Add Note to the selected component to enter a text-based message, or note, to be associated with the component. Refer to About notes for more information.
By default, components of the same type are listed in the order in which they were created, you can rearrange their order by clicking and dragging an item up or down. This allows you to group items logically, eg. group accounts by location, or triggers by purpose. Note that the order of components is to aid organisation, it has no effect on the resource assessment system.
Figure 1. Annual Accounting, Tree menu
Add an off-allocation system
Off-Allocation systems are assigned to the annual accounting system at the top Annual Accounting level. To add an off-allocation system, right click the annual accounting system (eg Annual Accounting 1, Figure 1) and choose Add Off-Allocation System. Refer to the Off Allocation node for information on how to configure the off-allocation system.
Account types
An annual accounting system may contain several account types (as defined by you). Each account type groups together accounts that are governed by the same set of rules (such as usage limits), or have the same priority of access to water.
To add an account type, right click on the annual accounting system and choose Add Account Type. Once defined, account types can be re-arranged in the tree by dragging and dropping to the required order. This will affect the control execution order and the ARA table column placement.
In the Account Type pane, you can use the:
- Configuration tab to configure the account type (shown in Figure 2);
- Accounts tab to view a summary of all accounts in the account type;
- Carryover tab to configure carryover; and
- Non-Debit Accounts tab to view and configure all non-debit accounts in the account type.
The next sections describe each of the tabs.
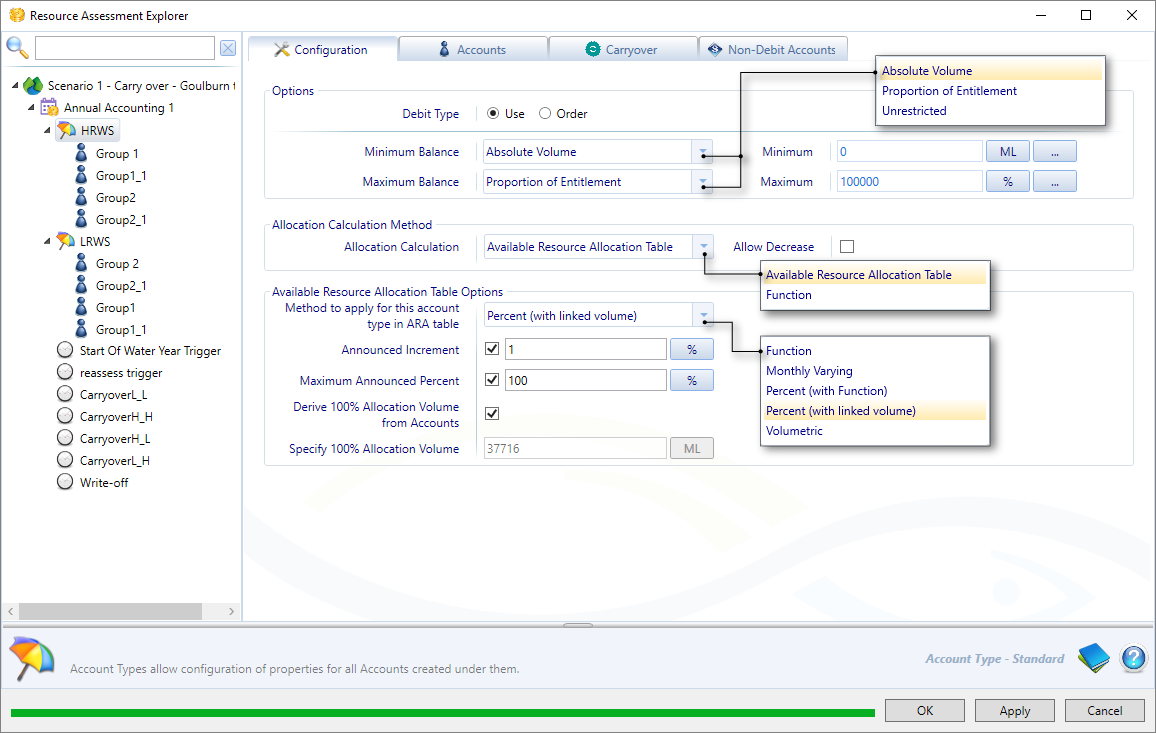
Account type configuration
Figure 2 shows the configuration parameters required for an account type. These are explained further in Table 1.
Figure 2. Annual accounting, Account type, Configuration
 a
a
Table 1. Annual Accounting, Account Type, Configuration
| Item | Description |
|---|---|
| Debit Type | Determines how water is deducted from all accounts associated with this annual accounting system; based on either order or extractions. |
| Minimum Balance | If a minimum balance is defined, then order or extractions will not be allowed if it will cause the balance to drop below the minimum specified for each account within the account type. Choose:
|
| Maximum Balance | Defines the maximum volume of water that can be allocated to an account as part of the allocation process for that account type. If an allocation results in this limit being exceeded, then the excess amount is available to other account types. Options are as for Minimum Balance. If you select Unrestricted, extraction will continue regardless of the account balance. |
| Allocation Calculation | There are two methods available for calculating allocation:
|
| Allow Decrease | This checkbox controls whether or not an account’s allocation can reduce within the water year. |
Table 2. Input parameters for the ARA Table options.
| Method | Input parameters |
|---|---|
| Function | Enter a function using the Function Editor. |
| Monthly varying | Choose the appropriate Calculation Method - either Interpolate or Threshold. |
| Percent (with function) | Configure the following parameters:
|
| Percent (with linked volume) - default | Same parameters as Percent (with function). |
| Volumetric | Volume. |
Accounts
Choose the Accounts tab to view a summary of the account host, entitlement and initial balance for all accounts within the selected account type. These parameters are summarised in Table 5 (see Account Configuration). A similar table containing a summary of accounts in all account types, is visible in the Accounts tab for the annual accounting system (see Figure II).
Carryover
This tab allows you to configure several parameters related to carryover, such as spill and its associated parameters (Figure 3). Spill is water released in excess of the downstream requirements. Table 3 explains the configuration parameters.
Figure 3. Annual accounting, Account type, Carryover
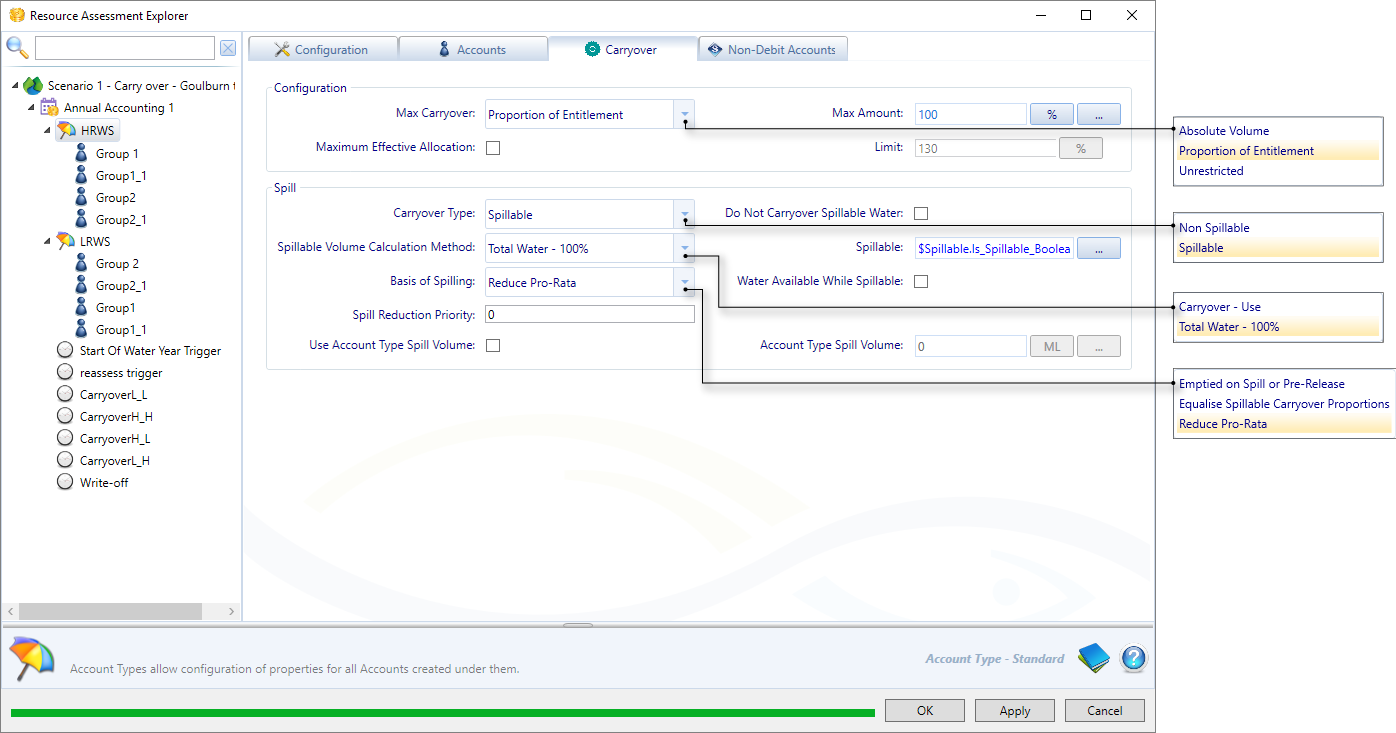
Table 3. Annual accounting, Carryover parameters
| Item | Description |
|---|---|
| Max Carryover | This is the maximum amount of water that can be carried over. It can be defined in terms of:
|
| Maximum Effective Allocation | The maximum amount of water that an account can hold, including allocation and carryover. If enabled, you must define effective allocation in the Limit field. For example, if you specify 130%, allocation plus carryover water cannot exceed 130% of the entitlement. The carryover water will be reduced to prevent allocation plus carryover from exceeding 130% of entitlement. If carryover account does not have enough water to bring maximum effective allocation down to the cap (caused by usage of carryover water etc.), then allocation account will be reduced. |
| Carryover Rules Changing Over Time | This allows carryover rules to be able to change over time. For example, it can be defined as: from 01/07/2000 to 30/06/2006, carry over is spillable; from 01/07/2006, carry over is non-spillable. |
| Carryover Type | Select the type of carryover to configure using the drop-down menu:
|
| Do Not Carry Over Spillable Water | If enabled, spillable water will not be available for carryover. If disabled, any remaining spillable water will be carried over to the next water year. |
| Spillable Volume Calculation Method | Spillable water is calculated using one of two methods:
|
| Spillable | Allows you to trigger the account to spill. You can specify a boolean function to switch account spilling on or off. |
| Basis of Spilling | There are three options available:
If different account types under the same spill source have the same priority, then the priority of spilling from account types with Emptied on Spill or Pre-Release first, followed by Equalise Spillable Carryover Proportions and Reduce pro-rata last. |
| Water Available While Spillable |
|
| Spill Reduction Priority | The priority of spill from the carryover account. The default value is 1, which is the highest priority. 2 is the next highest priority, then 3 and so on. During a spill, all accounts of the same priority are grouped together and the spill volume is distributed among these accounts pro rata. Any remaining spill is then passed along to the next priority grouping. |
| Use Account Type Spill Volume | When enabled, allows you to specify a value for Account Type Spill Volume. This volume will be used instead of the Spill Volume set at the top Annual Accounting System level (set on the Configuration tab, see Table 7.) |
Non-debit accounts (for NSW)
This tab allows you to work with non-debit accounts. First enable the Enable Non-Debit Accounts checkbox, which allows you to edit the remaining parameters (Figure 4). Parameters are explained in Table 4.
Figure 4. Annual accounting, Account type, Non-Debit Accounts
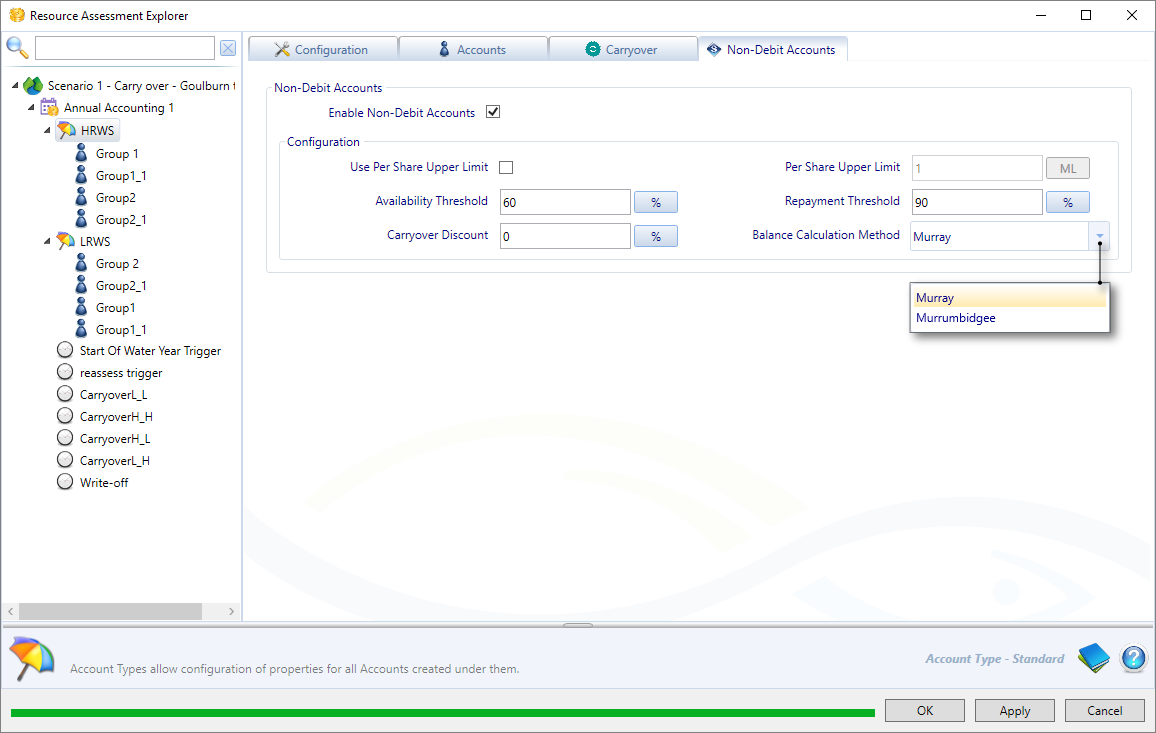
Table 4. Annual accounting, Account type, Non-Debit Accounts
| Item | Description |
|---|---|
| Enable Non-Debit Accounts | Toggle on to edit the other parameters in this tab except for Per Share Upper Limit. |
| Use Per Share Upper Limit | Enable to enter value into Per Share Upper Limit, which defines the maximum amount of non-debit water that may be used. The smaller of the Repayment Threshold and the Per Share Upper Limit will be used. |
| Availability Threshold | The allocation level at which the water user gets access to the account. |
| Repayment Threshold | The allocation level at which repayments need to be made. As the water user approaches its maximum allocation, repayments need to be made. |
| Carryover Discount | A discount implemented on the water that is carried over to the following water year. Note that this applies only when Murrumbidgee is chosen as the Balance Calculation Method. |
| Balance Calculation Method | Choose either Murray, Murrumbidgee or Belubula. This determines which set of rules to use. Upper Namoi is modelled by selecting the Murrumbidgee rules and enabling the Use Per Share Upper Limit. |
Accounts
Accounts allow a water user to request resources. They specify the entitlement that a particular water user has for that particular account type. The entitlement is used to apportion the available water between the accounts when new water allocations are made.
Adding an account
In Source, accounts are grouped together under account types, so to add an account, you first to need to add an account type. Right-click on the annual accounting system menu item and choose Add Account Type. Then, there are three ways to add an account:
- Right-click on an account type in the tree menu, choose Add Account from the contextual menu.
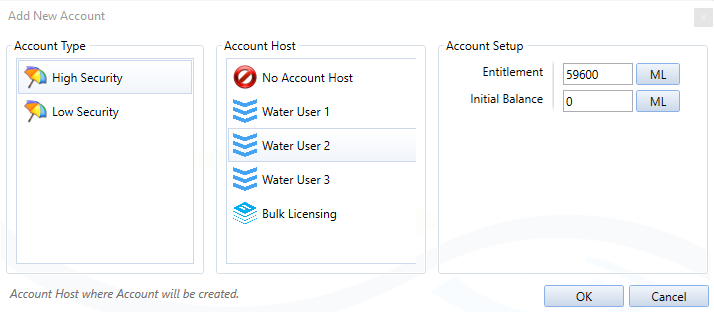
- Select an account type, choose the Accounts tab, and then select Add Account. This will open the Add New Account dialog (similar to that in Figure 5) where you can assign the accounts' host, entitlement and initial balance (defined in Table 5). Click OK.
- Select the annual accounting system, choose the Accounts tab, and then select Add Account. This will the Add New Account dialog (Figure 5) where you can assign the accounts' type, host, entitlement and initial balance (defined in Table 5). Click OK.
Figure 5. Annual accounting system, Accounts tab, Add New Account
Account configuration
Regardless of which method you use to add an account, to further configure or edit the account, select it from the tree menu, where it will be listed underneath its account type (Figure 6) These parameters are described in Table 5. Note that Entitlement and Initial Balance can also be edited on the Accounts tab of either the account type or annual accounting system.
Entitlement applies to the account regardless of the start date, but all other parameters on this tab only have effect when the model run commences on a date other than the first day of the water year. If a simulation is started part way through the water year the initial values in the Initial Values at Start of Run group box will apply. Carryover Scalar and Carryover at Start of Water Year are assumed values at the start of the water year that the run commences and do not change within the water year.
Figure 6. Annual accounting, Account type, Add account
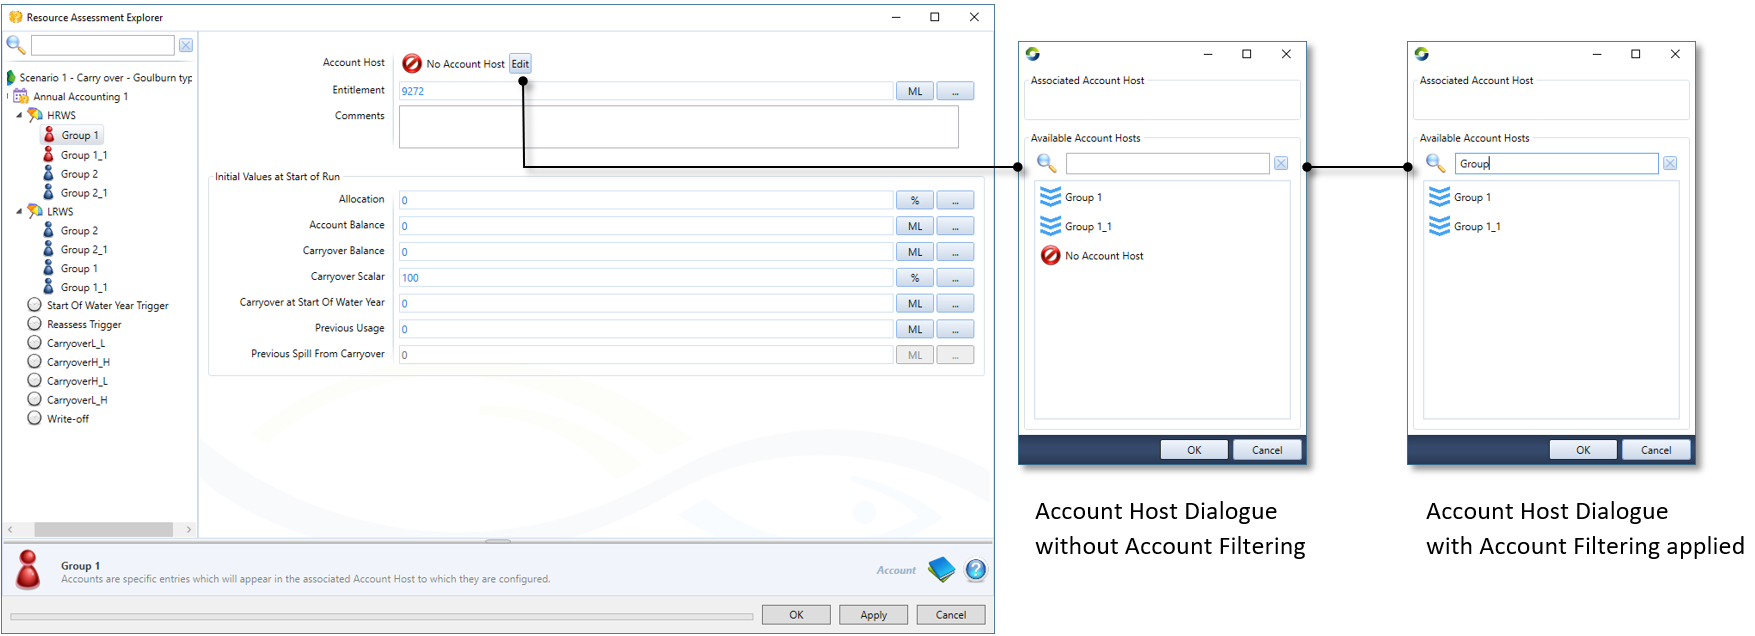
Table 5. Annual accounting, Account type, Account parameters
| Item | Description |
|---|---|
| Entitlement | Entitlement volume assigned to the account. |
| Allocation | Allocation on the first day of the model run. |
| Account Balance | As its name suggests, this is the initial account balance of the system (corresponds to Initial Balance in Figure 5 and Figure 9). If you enter an initial balance, ensure that there is sufficient water in storages to cover the total initial balances as well as the required reserves. Note that if the initial balances are set too high a warning message will be generated and the results may not follow the required logic. |
| Carryover Scalar | Used to reduce the carryover commitment. The product of the carryover scalar and carryover start of water year is the carryover commitment at the start of the model run for the account. The carryover scalar is reset to 0 at the beginning of each water year, and increased as resources allow the commitment to be met (in accordance with the ARA table). |
| Carryover Start of Water Year | The amount of water carried over from the water year prior to the water year that the run commences in. |
| Previous Usage | The amount of usage between the start of the water year that the run commences in, and the first day of the model run. |
| Previous Spill from Carryover | The amount of spill reduction from the carryover account between the start of the water year that the run commences in, and the first day of the model run. This is zero if the model run commences on the first day of the water year. |
| Associated Account Host | This lists all available account hosts in the model (corresponds to Account Host in Figure 5 and Figure 9). An account host can be water user, bulk licensing or environmental demand node. To associate an account host with this account select it from the list. A host can only be associated with one account per account type, so a host that already has an associated account will not appear in the list. Once these have been configured, this association is reflected in the host node's feature editor, which can be used to configure the distribution between associated accounts and carryovers, as follows:
|
Triggers
Triggers specify events that affect the behaviour of the annual accounting system, such as allowing you to reassess accounts during the water year. Triggers can be added to an annual accounting system, an account type or an account. To add a trigger, right-click on the component and choose Add Trigger. This will create the trigger and display the dialog where you can define and configure it, see Types of triggers. Once you have created triggers, you can configure their priority using the Trigger Priority tab for the annual accounting system, see Trigger Priority.
Usage limit
Accounts and account types may have limitations placed on their usage that are independent of their allocation (or account balance). This dichotomy may occur because the allocation relates to a water year, and the usage limitation relates to multiple years or a moving time period.
Usage limits can be added to an account type or an account. To add a usage limit, right-click on the component and choose Add usage limit, then configure the usage limit using the dialog (Figure 7, Table 6). An account can have several usage limits, each can be designed to initiate a particular limit.
Figure 7. Annual Accounting, Usage limit

Table 6. Annual Accounting, Usage limit parameters
Item | Description |
|---|---|
| Period | Time period that the limit applies to - Moving Water Year, Moving Window or Water Year. Moving water year is very similar to moving window but is based on a succession of water year. For example, if usage limits relates to 2 successive water years, choose Moving Water Year and set Years to 2. If a usage limits relates to a single water year, choose Moving Water Year and set Years to 1. Where a "rolling years" usage limit has been defined in IQQM for general security accounts, these should be defined as Moving Water Year limits in Source. |
| Quantity | Specify if the limit is Proportion of Entitlement or an Absolute Volume. To replicate IQQM, set this parameter to Proportion of Entitlement. |
| Years | For a moving water year, enter the number of years the usage limit applies to. For a moving window, define the number and time units (eg. days) that the usage limit applies to. |
| Quantity | Usage limit over the period that is to be applied to all accounts, as either Proportion of Entitlement or Absolute Volume. |
Annual accounting system configuration
As shown in Figure 8, you can do the following at the top Annual Accounting level:
- Configure annual accounting using the Configuration tab;
- View summary information of all accounts added with the Accounts tab;
- Set the available resource vs allocation (ARA) table using the Allocation tab; and
- Set trigger priority with the Trigger Priority tab.
The next sections provide further details of all the tabs listed above.
Configuration
This tab provides an overview of the annual accounting system (Figure 8); configuration parameters are explained in Table 7.
Figure 8. Annual Accounting, Configuration
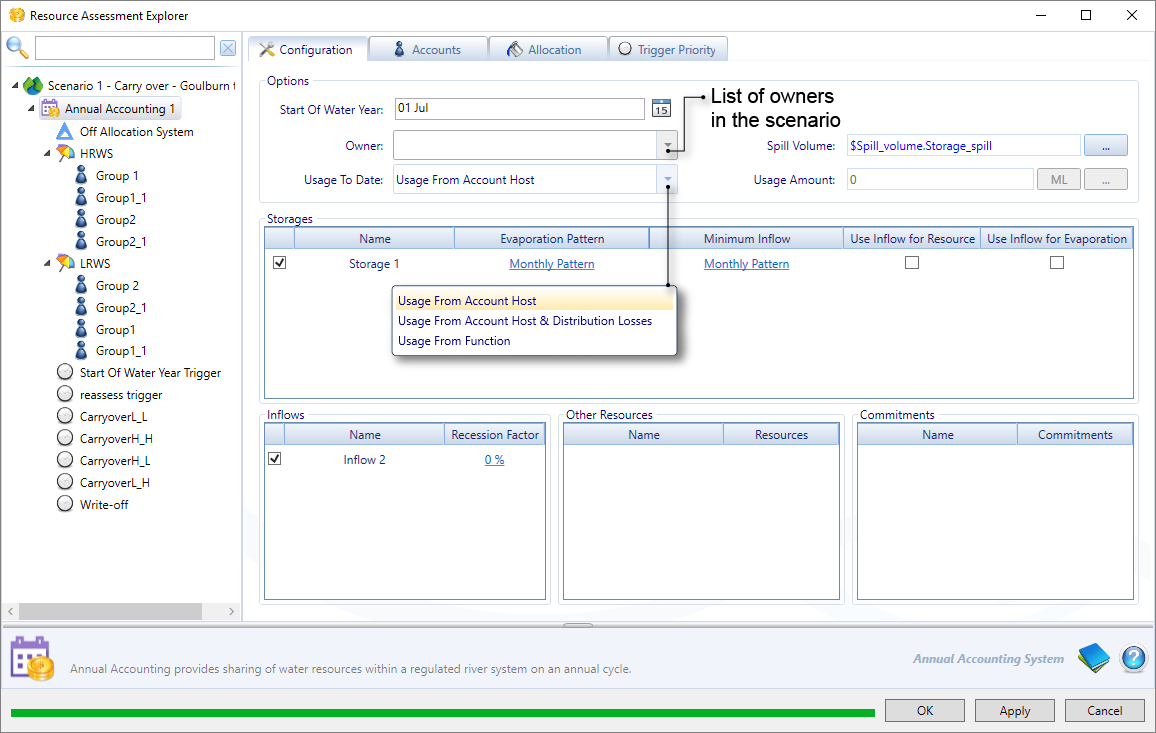
Table 7. Annual accounting, Configuration tab
| Item | Description |
|---|---|
| Start of Water Year | Day-month that the water year starts. If unspecified, it defaults to 1st July. |
| Owner | This lists all the owners that have been configured using the Ownership Setup dialog (refer to Ownership in Source). |
| Usage to date | Determines how much of the water allocated has been ordered or used by water users in the water year to date. There are three options available:
|
| Spill Volume | In cases where the available water is in excess of the volume ordered by entitlement holders, the extra volume is referred to as Spill Volume. This is usually defined as a function. |
| Usage Amount | Only applicable when Usage to date is assigned Usage from Function, enter a function or value for the usage amount. |
| Storages | Lists all the storages in the scenario. Enable a storage by toggling on the check box to use it as a resource in the annual accounting system. For each enabled storage, you may specify the Evaporation Pattern and Minimum Inflow as a monthly pattern. Note that net evaporation can be negative. At assessment date, the available storage volume is reduced by the net evaporation volume to end of season and may be increased by the inflow volume to end of season (if Use inflow for resource is enabled). These monthly volumes are appropriately proportioned when assessment/end of season dates are not at start/end of month. Enable Use Inflow for Resource to add the sum of the inflows to the end of the water year to the current storage volume. Enable Use Inflow for Evaporation to add the sum of inflows to the end of the water year to the current storage volume before determining surface area to calculate volume of evaporation. If neither Use Inflow for Resource nor Use Inflow for Evaporation is enabled, even if there is a Minimum Inflow monthly pattern defined, it will not be used in calculations. |
| Inflows | Lists all the inflows in the project. Enable any inflow to use it as a resource for the annual accounting system. The recession factor of each inflow can be set either as a constant value or as a function. Source multiplies the downstream flow volume for the selected inflow node by the recession factor to calculate the volume of water available as a resource. |
| Other Resources | Represents other resources such as inter-valley transfers. To add another resource, click on the cell under Name and enter a name, then click on Function... under Resources to enter a value or define a function to represent that resource. |
| Commitments | These are used to represent other commitments such as special reserves or provision for minimum flows. Commitments are added the same way as Other Resources, see above. |
Accounts
This tab provides a summary of all the accounts in the annual accounting system in the Accounts table. Its parameters are outlined in Table 5 (see Account Configuration) You can add an account from this tab by selecting add account, see Adding an account and Figure 5. Account Entitlement and Initial Balance can be be set by using a fixed value, data source or function (Figure 9).
Figure 9. Annual Accounting, Accounts tab

Allocation
The Allocation tab contains the available resource vs allocation table (ARA table), which shows the quantity of resources required to achieve the specified allocations, including provision for carryover. Parameters to specify in this dialog are outlined in Table 8.
You can copy cells of the ARA table by selecting the cells so that they are highlighted blue, and then pressing Ctrl+C. You can then paste the contents elsewhere in the ARA table or to another program by pressing Ctrl+V. When you paste the cell contents into another program the name of the column(s) will also bepasted. You can also paste values from an external program into the ARA table.
Figure 10. Annual accounting, Allocation tab
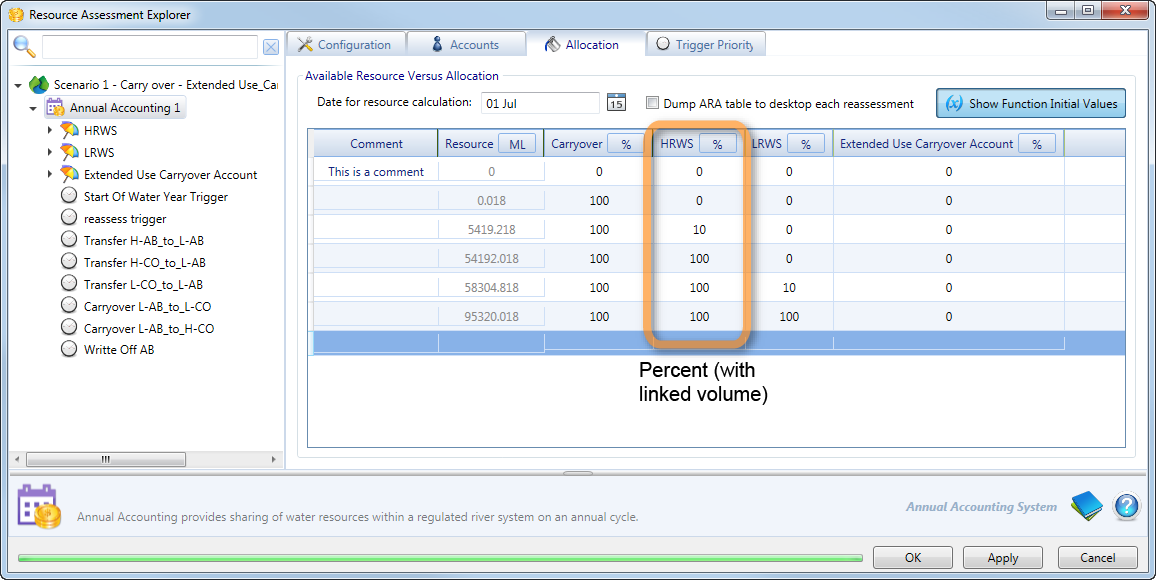
Table 8. Annual accounting, Allocation parameters
| Item | Description |
|---|---|
| Date of resource calculation | Choose your desired date by clicking on the date-picker. |
| Show Function Initial values | When enabled, this shows the initial values of functions being used for the account type and is only applicable when Function or Percent (with Function) is chosen as the preferred option in Method to apply for this account type in ARA table for account type (as shown in Figure 2). |
| Dump ARA table to desktop each reassessment | When enabled, the ARA table is exported to the local machine's desktop for every re-assessment. It is particularly useful when checking the available resource and allocation after each re-assessment. |
| Parameters in the ARA table - Configuration of the Resource and Account Type columns depends on which method was chosen for Method to apply for this account type in ARA table, this can be found on the configuration tab for each account type (see Configuring an account type). Table 9 explains how the ARA table varies with this parameter. Table 9 explains how the ARA table varies with this parameter. | |
| Resource | The water available in the system. |
| Carryover | The proportion of water that is carried over to the next water year. |
| The remaining columns correspond to the account types in the annual accounting system. | |
Table 9. Annual accounting, Allocation (Variations)
| Menu option in ARA table | Resulting variation in Allocation tab (Annual Accounting) |
|---|---|
| Percent (with linked volume) | The allocations in the Account Type column(s) can be edited directly on the table. The Resource column is calculated automatically based on the percentage allocation of the Account Type share volume. |
| Function | The Resource column is calculated based on the function specified for the Account Type on its configuration tab. To view or edit the function, use the Account Type's configuration tab. |
| Monthly-varying | In the Account Type column, click the hyperlink to open the table showing the allocations for each month in the water year. Values in the table will be calculated depending on the option chosen for the calculation method in the Account Type configuration tab. If Interpolate is chosen for the calculation method, the Resource of the first column is calculated based on the current and next month values. If Threshold is chosen, the value in the Resource column corresponds to the value in the current month. You can set the resource for each monthly manually or by importing it. This data can also be exported. |
| Percent (with function) | In the Account Type column, click Function... to specify what proportion of Shares (in the Account Type) will be assigned to the Resource column. For example, consider Shares = 50000ML, and the function specifies 10% in the Account Type column, the value in the Resource column will be 5000 (10%*50000) ML. |
| Volumetric | The value is directly editable in the table. The Resource column is then based on the value in the Account Type column. |
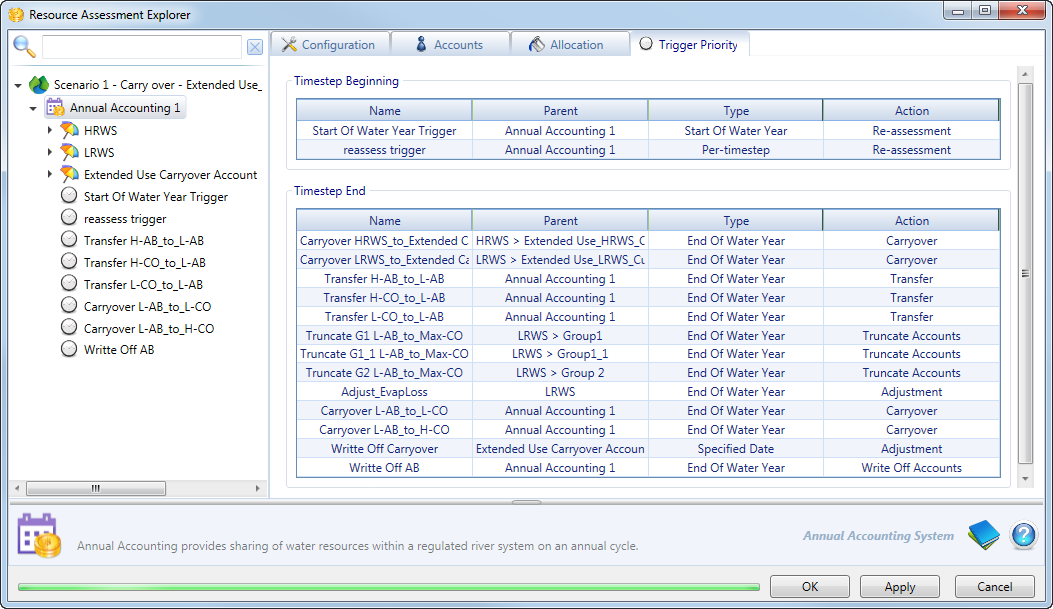
Trigger Priority
Triggers are used to initiate or cancel certain actions for an account and various triggers can be added at different levels in annual accounting. There are several types of triggers - refer to Types of triggers.
Once defined, triggers appear in the Trigger Priority tab (Figure 11) and are separated depending on their time of execution: Timestep Beginning or Timestep End. They can be prioritised by clicking and dragging to the desired location.
Figure 11. Annual accounting, Priority Trigger