Note: This is documentation for version 4.11 of Source. For a different version of Source, select the relevant space by using the Spaces menu in the toolbar above
Projects and scenarios
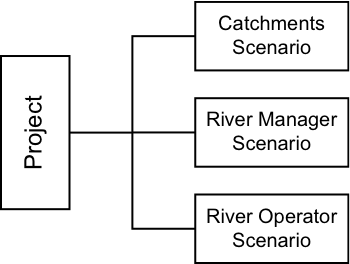
A Source model consists of two parts - a project and one or more scenarios. A project is a collection of one or more scenarios. It identifies the project name (also the file name), description, and any scenarios associated with the project. You can only have one project file open at a time and you should not open the same project file using more than one copy of Source.
A scenario is the representation of a node-link network in Source. The relationship between a project and a scenario is shown in Figure 5.
Figure 5. Projects and scenarios
A scenario describes the major processes in a river system or catchment that are modelled. This includes catchment and sub-catchment definition, rainfall runoff and constituent generation models, data sets and parameters. You can create multiple scenarios to:
- Break complex projects into distinct parts; or
- Duplicate existing scenarios to conduct what-if experiments without disrupting the original.
Any change to the definition of sub-catchments, node-link network, FUs, or the models within FUs, forms a new scenario. Similarly, a different set of inputs or parameters can be used to set up a new scenario, such as a change in land use or a climate change.
Projects
Creating a new project
To create a new project, do one of the following:
- Choose ;
- Click New Scenario on the File toolbar; or
- Press Ctrl+N on your keyboard.
You can only have one project file open at a time. Do not try to open the same project file using more than one copy of Source because you may lose your work.
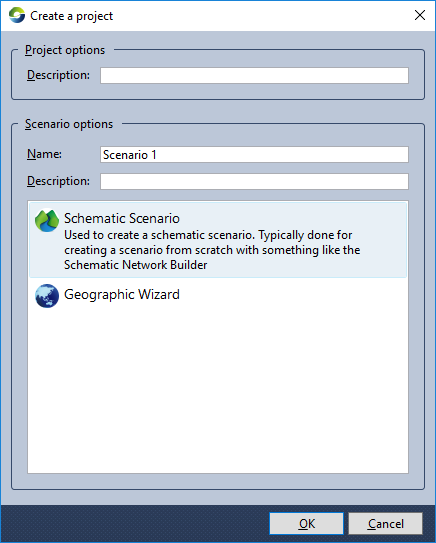
In the resulting window (Figure 1), enter the following:
- The scenario name. Once again, provide a meaningful name or accept the default. All the scenarios in a project must have unique names;
- Choose the desired kind of scenario (refer to About scenario types for the different types available); and
- Click OK.
Figure 1. New Project dialog
Saving a project
To save an open project, choose . This saves a project file with the extension *.rsproj. If it is the first time you are saving your project, the Save As dialog opens and gives you the opportunity to choose the location and name of your project file. By default, the name of the file is the name of your project. If you wish to save a different version of your file, choose
Closing an open project
To close an open project, choose . This closes the current project and prompts to save your work (Figure 2). Click the appropriate button.
Figure 2. Close project

Opening an existing project
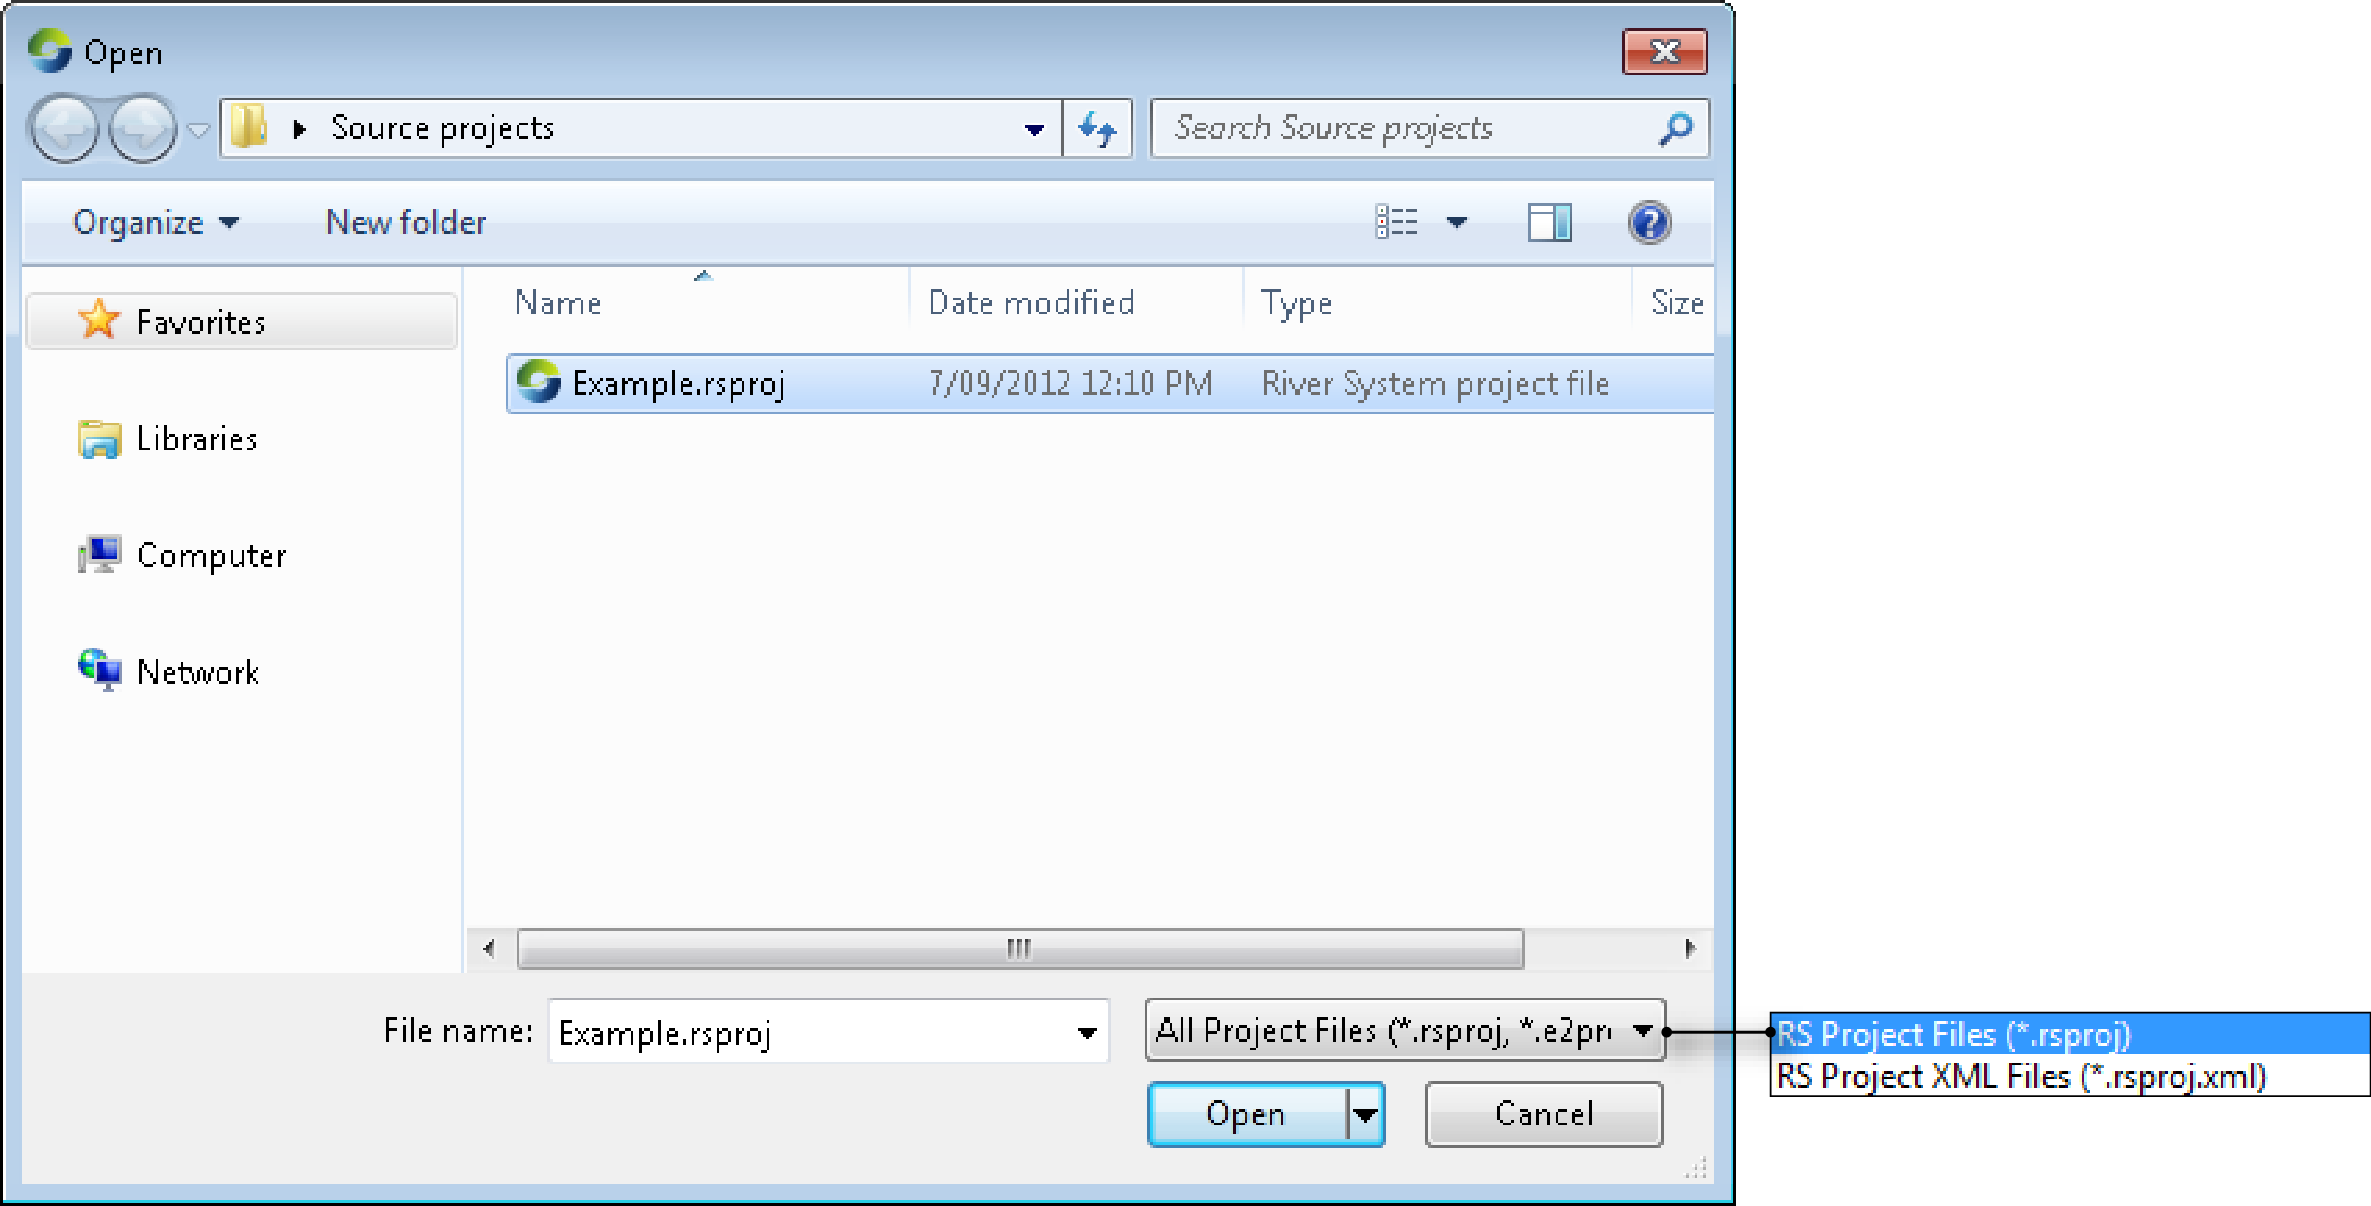
To open an existing project, either:
- Choose File » Open Projector
- Click Open Project on the File toolbar.
This opens the standard Windows™ open dialog (Figure 3). Note that opening a new project prompts you to save any open project.
Figure 3. Open project
Copying projects
You can duplicate existing projects by copying them. In your local machine's File Explorer, select the desired project, right-click and choose Copy. In the target location, right-click and choose Paste.
Scenarios
About scenario types
Three scenarios have been described in this guide:
- A schematic scenario is primarily concerned with modelling longer time-scales;
- An operations scenario is primarily concerned with shorter time-scales. It utilises facilities for forecasting and working with unaccounted differences, and typically makes heavy use of the Tabular Editor; and
- A catchments scenario which deals with the management of upland catchment processes. It is usually constructed using the Geographic Wizard for catchments which is a structured sequence of steps that guides you through the construction process.
It is important to choose the correct type of scenario before you start building your model. Although a project can contain several scenarios, a scenario type is fixed once it is created and cannot be changed later. Note that scenarios are independent of each other; a change in one scenario does not impact another scenario.
The operations described for a project (above) are also available for scenarios. In addition, you can also import and compare scenarios.
Working with scenarios
Scenario management
Various menu items allow you to manage scenarios at a high-level.
- When running different scenarios, you can use scenario input sets to set values for input parameters. Choose Edit » Scenario Input Sets...;
- Tools » Export summary... allows you to save a text archive of the chosen scenario to a .csv file; and
- Feature Table (accessible via Edit » Feature Table...) provides an overview of the selected scenario, and can be used to edit component parameters.
Creating a scenario
A project must contain at least one scenario. Whenever you create a new project, you are also prompted to create a scenario. You can create additional scenarios using any of the following methods:
- Choose
- Click New Scenario on the File toolbar; or
- Click New Scenario (by menu) on the Project Explorer toolbar.
To create an Operations scenario, first create a Schematic scenario. Then, choose Tools » Rivers Operations
Opening a scenario
When a project only contains one scenario, that scenario is opened automatically when you open the project. However, when a project contains more than one scenario, you must open each scenario individually. To view a scenario that is contained within a project, double click the scenario name from the list in the Project Hierarchy. This opens the appropriate editor for the selected scenario, and changes the scenario name to a bold appearance so that you know it is the current, or active scenario.
You can also select a scenario from the list of loaded scenarios on the View menu. Selecting a scenario from the list makes it active.
Source supports backward compatibility for projects created in Source after v3.1.0.
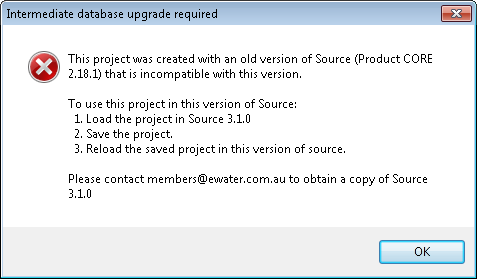
Note: You must upgrade a project if it was created in Source v3.1.0 or earlier. If you open these projects in later versions of Source, an error message (shown in Figure 4) will appear prompting you to save in v3.1.0. Follow the steps outlined in the dialog to automatically upgrade the project to the current version of Source.
Figure 4. Opening a project, error
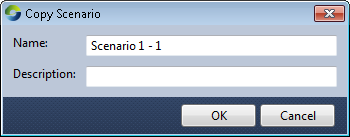
Copying a scenario
You can duplicate existing scenarios, provided they are part of the same project. You may want to do this if you wish to experiment with variations without affecting your original scenario.
To duplicate a scenario, click Copy Scenario on the Project Explorer toolbar. Source makes a copy of the current scenario and asks you to name the copy (as shown in Figure 5). You can either accept the proposed name or supply one of your own. Keep in mind that scenario names must be unique within a project.
The new (copied) scenario will be a duplicate of the original at the time of the copy.
Figure 5. Copy Scenario
Renaming a scenario
Source automatically gives new scenarios the default name of "Scenario #n" , where n is a number. To rename a scenario:
- Select the scenario in the Project Hierarchy; and
- Once the scenario name is selected, pause then click again. When the entry is highlighted, you can enter a new name. Remember that scenario names must be unique within a project.
Linking scenarios
You can link two scenarios using a Connecting Models. Note that some components of the first scenario may not pass on to the second, linked scenario.
Comparing Scenarios
The full version fo Source has functionality for determining the difference between scenarions. For more information please see Troubleshooting and Debugging.
Copying network elements
When copying a partial scenario, the effect on each network element is different, see Nodes and Links - Copying and pasting.
Audit Log
Figure 1. Audit Log Commit Message
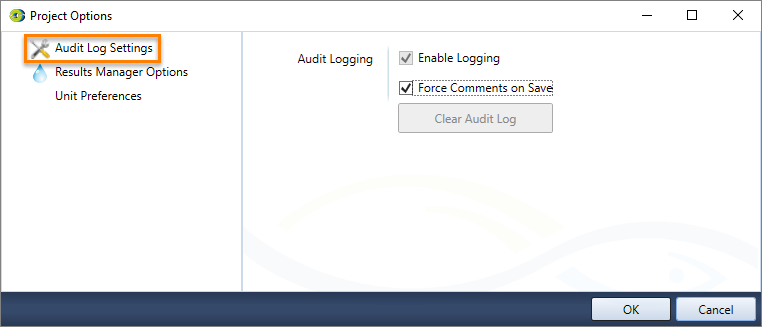
The audit log keeps track of the changes made to a project over time. This is particularly important for projects that are worked on by multiple people. It contains a combination of software generated information on model changes and provides an opportunity for users to annotate the purpose of those changes with a commit message when the project is saved.
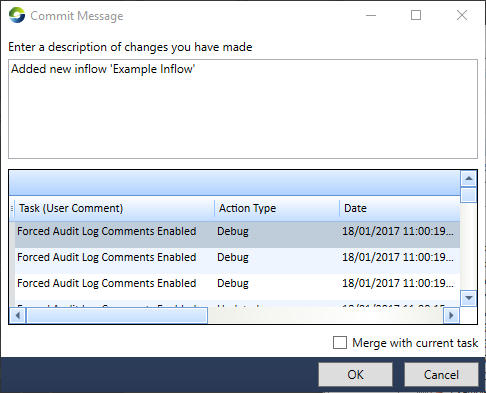
Commit messages are used to group software generated logs in a way that makes sense to users working on the project. If the same issue is being worked on in multiple concurrent sessions, you can select Merge with current task to group the logs under the previous commit message.
Figure 2. Audit Log Viewer
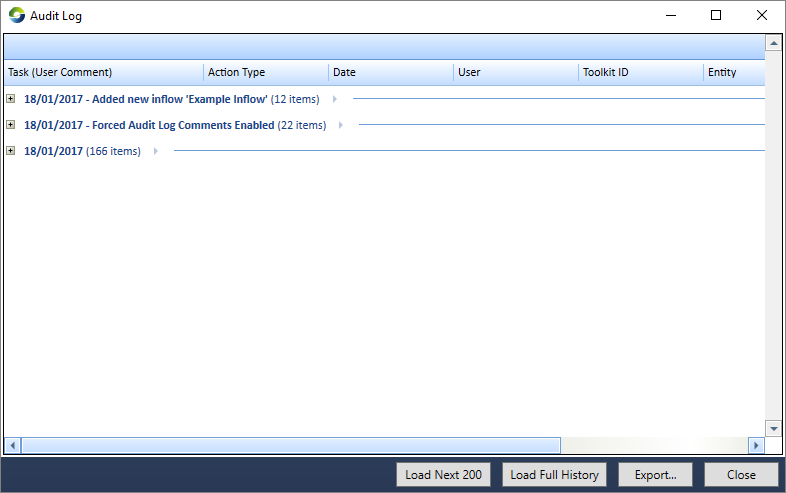
A large audit log attached to a project can become a processing burden, especially in the case of large projects. Audit logging is on by default, but can be disabled in Edit »Project Options» Audit Log Settings by toggling off Enable Logging.
Figure 3. Project Options, Audit Log Settings