Note: This is documentation for version 5.0 of Source. For a different version of Source, select the relevant space by using the Spaces menu in the toolbar above
Confluence node
- Neither branch is regulated - no configuration is required as there are no orders;
- One branch is regulated; or
- Both branches are regulated.
Unregulated branches
For rules based ordering, the confluence forecast model ignores any upstream nodes on the unregulated branch. This means that any upstream inflow node forecast models are ignored in the confluence node forecast calculation in rules based ordering phase. For network LP ordering, the unregulated branch may be configured as regulated if processes on the unregulated branch are to be modelled in the order phase.
One regulated branch
If there is only one regulated branch, the unregulated branch behaves like an inflow node. As there is only one regulated upstream branch, priority setting is not required. In this case, the confluence node can be thought of as acting in a similar manner to an inflow node.
As such, the branch which is unregulated needs to have forecasting ability of the inflow arriving, so that orders may be adjusted for the expected inflow. Therefore the confluence node has a forecasting model attached to it (as shown in Figure 1). The forecast model is the same as that available for an inflow node (see Forecasting inflows).
Figure 1. Confluence node (Single regulated branch)
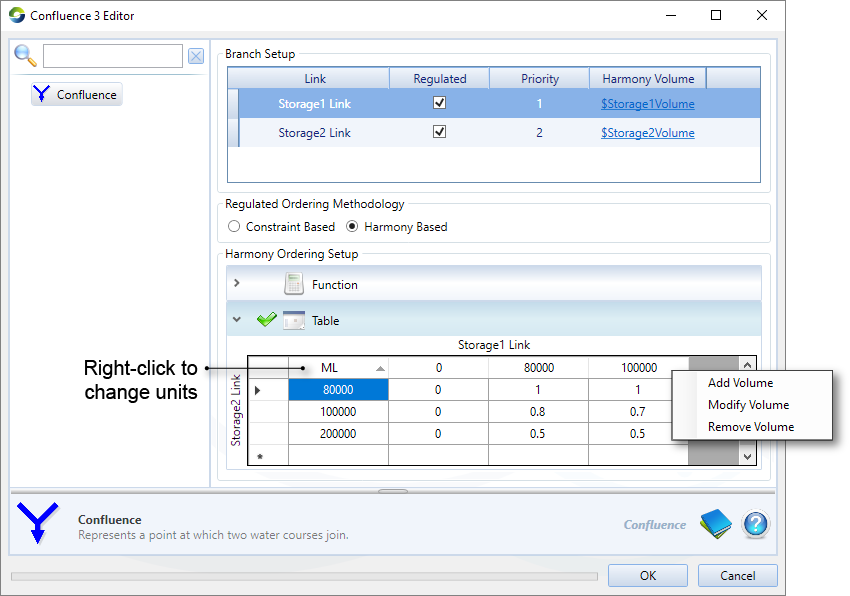
Both regulated branches
If both branches are regulated, you need to define how orders may be split by choosing one of the two methods specified under Regulated Ordering Methodology (Figure 2).
Constraint Based
Specify a priority for each branch. Click the cell in the Priority column and edit the value. This is the default option.
Harmony Based
You must also specify how to split the upstream orders (under Harmony Ordering Setup) - using either:
- A Function that defines the proportion of the total order assigned to the named upstream branch based on model parameters; or
- A Table that has the proportional relationship on how orders are to be split upstream based upon the defined volume of water up each branch for each owner (eg. Figure 2).
If you select the table option, you must also define the upstream volume for each branch using functions (in the Branch Setup table). The top row of the Harmony Ordering Setup Table displays the volume of the first branch, its name is listed above the table (eg. Storage1 Link, Figure 2). The first column lists the volume for the second branch (eg. Storage2 Link, Figure 2). The table entries define the proportional split of the orders between the two branches, relative to the first branch. For the example shown in Figure 2, if there was 80000 ML up the Storage1 Link (as defined by the $Storage1Volume function) and 100000 ML up the Storage 2 Link (as defined by the $Storage2Volume function), then 80% of the orders would be sent up the Storage1 Link, and 20% would be sent up the Storage2 Link.
Use the table as follows:
- Right click on volumes in the top row to open the context menu, where you can select:
- Add Volume to add a new column, entering the volume.
- Modify Volume to edit the volume for that column
- Remove Volume to delete the column.
- To add a row, click on a cell in the last row to highlight and edit it.
- Right click on volumes in the top row to open the context menu, where you can select:
Figure 2. Confluence node, harmony based