Note: This is documentation for version 5.0 of Source. For a different version of Source, select the relevant space by using the Spaces menu in the toolbar above
Scenario Input Sets
Scenario input sets allow you to easily keep model structure, while switching between groups of input data and parameters. These may be used to represent changeable physical attributes, such as climate, land use decisions or even proposed infrastructure characteristics. You can switch between different scenario input sets to compare the effects on a model. For example, you can have one scenario input set consisting of rainfall, inflow and evapotranspiration data for natural conditions, another for wet conditions and a third set for dry conditions.
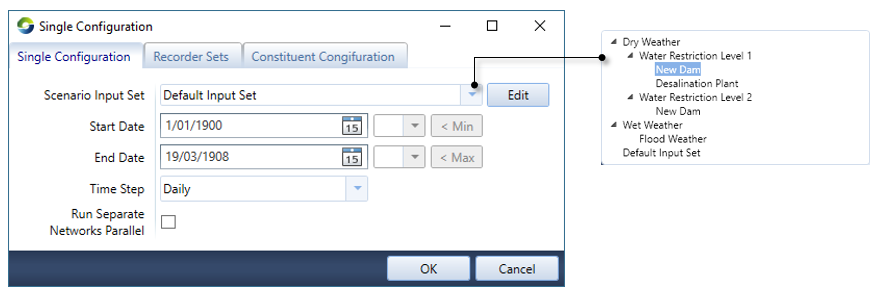
You choose the scenario input set used for a run using the Scenario Input Set drop-down menu in the Configure dialog (Figure 1), accessed by clicking Configure on the simulation toolbar.
Figure 1. Configure, choose scenario input set.
Scenario input sets are created and managed using the Scenario Input Sets dialog, which is accessible via Edit » Scenario Input Sets...
Using the panel on the left, then right-clicking, you can do the following using the contextual menus:
- Add Scenario Input Set – create new parent scenario input set;
- Add Child Scenario Input Set – create new child scenario input set, the selected input set will be the parent;
- Rename – change the name of a scenario input set; and
- Delete – remove a scenario input set.
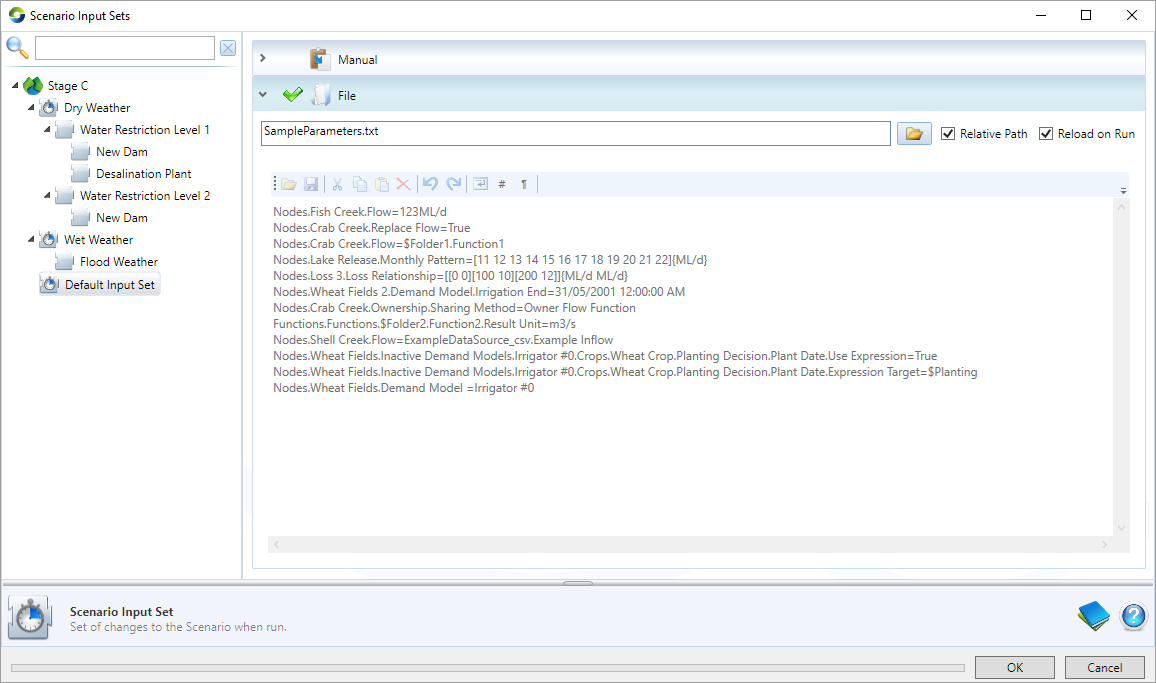
Scenario input sets can define both input parameters and data sources. Input parameters specific to a scenario are defined in the Scenario Input Sets dialog, either manually or using a file. Data sources are assigned to scenario input sets using the Load Data Source dialog, as explained here.
Figure 2. Scenario input sets, parameter entry
Searching Input Sets
In the Manual parameter set editor. Search can be triggered by pressing Ctrl+F while the editor is selected. A search bar in the top right hand corner will appear (see figure below). The search will highlight any matches, and can be configured by the drop down in the search box (match case, match whole and regular expressions).
Figure 3. Scenario Input sets, search dialog

Child Scenario Input Sets
Child scenario input sets allow you to further refine model scenarios. A child scenario input set inherits all parameters and data sources specified in its parents. If changes are made to the parent scenario input set, existing and new children will inherit those changes. You can then set additional parameters, or alter existing ones, overwriting the inherited parameters. When you run a model with a child scenario input set, for any parameters that differ between the parent and child, the parameters from the child will take precedence.
Figure 4. Child Scenario Input Sets, Example
For parent and child scenario input sets:
- You can create 'grandchildren', thus creating nested scenario input sets. Every child scenario input set inherits all parameters above it in its branch, and ignores any parameters set in its children.
- Deleting a parent will delete all of its children.
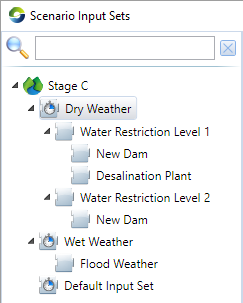
- Within both the Configure dialog (Figure 1) and Results Manager, child scenario input sets are referred to be their full path, eg. Dry Weather.Water Restriction Level 1.New Dam.
Data sources can only be assigned to the root-level parents (Dry Weather, Wet Weather and Default Input Set in Figure 3). This is indicated by the![]() icon. For more infomation see Assigning data sources to scenario input sets.
icon. For more infomation see Assigning data sources to scenario input sets.
Adding Scenario Input Sets
First, open the Scenario Input Sets dialog, via Edit » Scenario Input Sets...
A new root-level scenario input set:
- Right-click on the scenario's name and select Add Scenario Input Set from the contextual menu (Figure 2). This will open the New Scenario Input Set dialog (Figure 4).
- You can use this dialog to copy the assigned data sources from another root-level scenario input set to this one. From the drop down menu, select the scenario input set from which to copy the data source usages, or select <Empty> if you do not wish to assign data sources at this time.
To add a new child scenario input set:
- Right-click on the scenario input set that you wish to be the parent, and choose Add Child Scenario Input Set from the contextual menu (Figure 2).
Figure 5. New Scenario Input Set

Input parameter entry
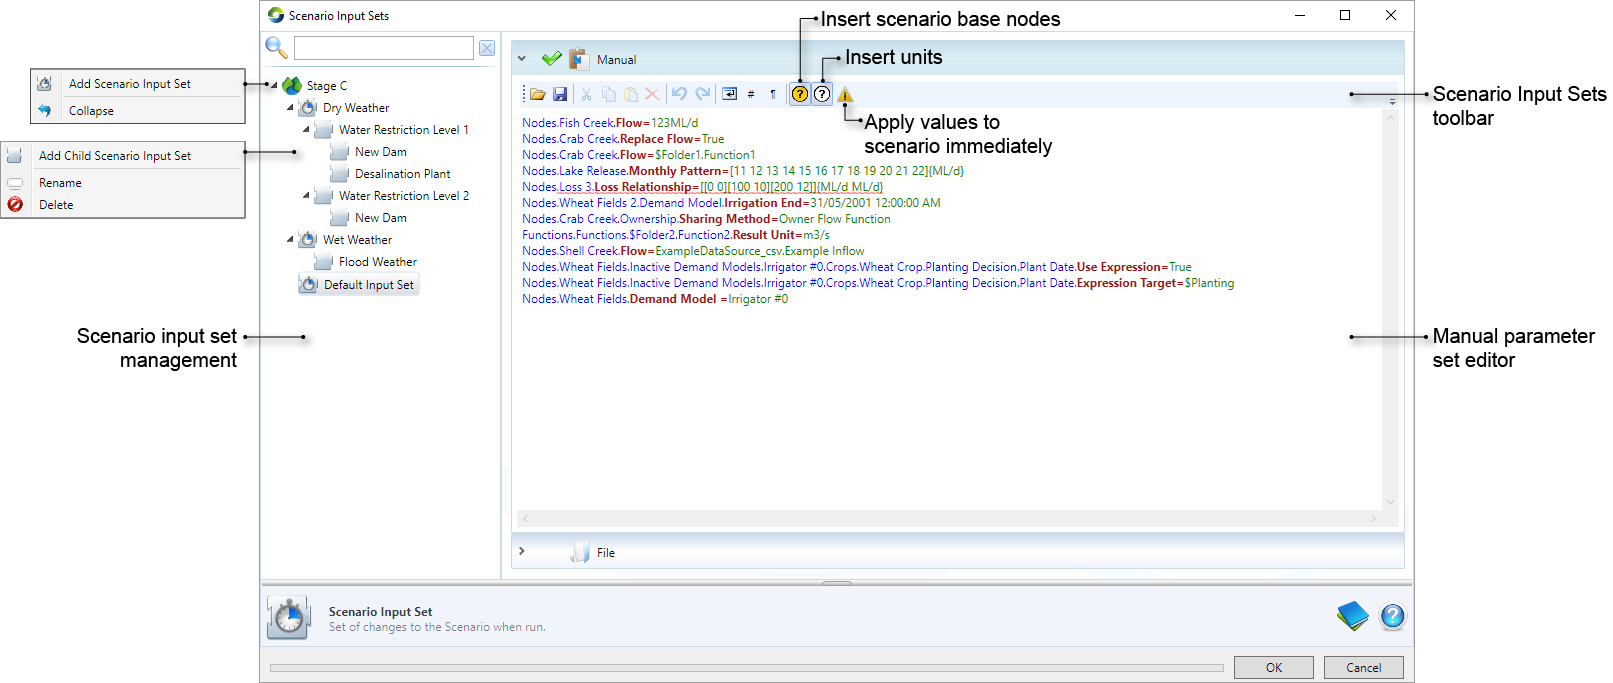
Parameters specific to a scenario input set are defined and managed using the parameter set editor in the Scenario Input Sets dialog (as shown in Figure 2). The panel on the right allows you to specify parameters, either manually, or by loading a text file.
The general format for a parameter is: path1.path2...pathN=value (eg. Nodes.Inflow1.Flow=10 ML/d).
Manual entry
Figure 1 shows an example of manual parameter entry using the manual parameter set editor. This editor has the following features:
- An auto-complete functionality, press Ctrl + space to get a list of available elements;
- Typing additional characters filters the auto-completion list. Items can also be selected by pressing the down arrow key ('↓');
- Once the correct element is selected, pressing Tab or Return auto-fills an element from the list;
- Pressing the period character ('.') displays a list of valid elements for the next step in the path;
- For a valid path, pressing the equals character ('=') displays candidate values;
- Click the Insert units icon for a list of available units. Note that these are not scenario-dependent so you must choose the correct item; and
- An invalid parameter is identified with a red underline (illustrated in Figure 2 for the Loss 3 node, which was deleted after the parameter was created). Acceptable parameter types are provided in Table 1.
Table 1. Types of parameter values
| Parameter type | Example shown in Figure 2 |
|---|---|
| Boolean | True |
| Dates | 31/05/2001 12:00:00 AM |
| Enumerated or fixed list | OwnerFlowFunction (one available option for Ownership Sharing Method) |
| Floating types associated with units - units should be valid for the type of parameter being set | 123 ML/d |
| Interpolated functions | [[0 0][100 10][200 12]]{ML/d ML/d} |
| Patterns - numeric values separated with a space and of a defined number | [11 12 13 14 15 16 17 18 19 20 21 22]{ML/d} |
| Unit type | m3/s |
| Function | $Folder1.Function1 |
| Data source | ExampleDataSource_csv.Example Inflow |
For a parameter that can take as input either a day of year or a function (eg. on farm storage planting decision plant date), if you change the input from a specified day and month to a function or vice versa, you need to set a boolean as well. An example of changing from a specified day of year to a function is shown in Figure 2, an example of changing from a function to a specified day of year is:
Nodes.Wheat Fields.Inactive Demand Models.Irrigator #0.Crops.Wheat Crop.Planting Decision.Plant Date.Use Expression=False
Nodes.Wheat Fields.Inactive Demand Models.Irrigator #0.Crops.Wheat Crop.Planting Decision.Plant Date.Day=20
Nodes.Wheat Fields.Inactive Demand Models.Irrigator #0.Crops.Wheat Crop.Planting Decision.Plant Date.Month=12
You can also use scenario input sets to change the active demand model at a water user node, for example:
Nodes.Water User 3.Demand Model=MyInactiveDemandModel
If you wish to change some parameters in an inactive demand model, and also make it the active model, then you need to specify the parameter changes first. An example is shown in Figure 2 for the inactive demand model Irrigator #0.
File-based parameter specification
The file-based parameter entry (shown in Figure 5) allows the specification of a file that will contain the element path and values. The formatting of this file must adhere to the same rules as the manual parameter set editor.
Note that the Reload on Run and Relative path checkboxes follows the same rules as for data sources.
Figure 6. Input parameter set using a file
Referencing scenario input sets in functions
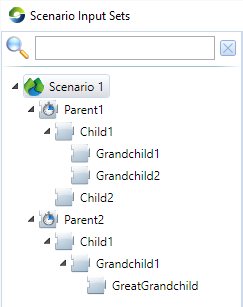
The built-in variable $ActiveInputSet allows you to use the active scenario input set as a variable in a function, for example if($ActiveInputSet = "Wet", 15, 10). The active scenario input set is selected through the Configure dialog (Figure 1). When working with a scenario that contains parent and children scenario input sets (eg, Figure 6), the following conventions apply:
- To identify a specific scenario input set, use its full path, eg. "Parent1.Child1", or "Parent2", or "Parent2.Child1.Grandchild.GreatGrandchild".
- To identify any children of a specific scenario input set, use its full path followed by a full stop, eg. "Parent1.Child1." will be true for Parent1.Child1.Grandchild1 and Parent1.Child1.Grandchild2.
- To identify a child scenario input set, regardless of its parents, use its name preceded by a full stop. For example ".Child1" will be true for Parent1.Child1 and Parent2.Child1
- The previous two conventions can be combined to identify any children of a child input set, regardless of its parents. For example, ".Grandchild1." will be true for Parent2.Child1.Grandchild1.GreatGrandchild.
- If you want to identify a specific scenario input set and any of its children, use an or function combined with an if function. For example if($ActiveInputSet=".Grandchild1" or $ActiveInputSet = ".Grandchild1.", 5, 1) will be true for Parent1.Child1.Grandchild1, Parent2.Child1.Grandchild1 and Parent2.Child1.Grandchild1.GreatGrandchild.
Figure 7. Child Scenario Input Sets, Example for function referencing.